Order Dispatching in Merchant Ag displays all open retail, feed and assembly orders providing one location to confirm orders, enter expected and completed delivery dates or edit and settle orders. The new Map function displays deliveries by customer ship to addresses and the ability export the grid to an .xls spreadsheet is available.
| Access |
| Grant permission to User Profiles in Access User Profiles > select a User Profile > Menu Security > Accounts Receivable > Main Menu > Access Dispatching. |
Filter the Grid
Customize the orders listed by using one or multiple filters.

Filter the orders listed by using the drop down list available in Merchant Status. The options include
|
|
|
|
|
|
Orders received from FieldAlytics can also be highlighted by selecting a filter in the FA Status field. Choose Accepted, Assigned or Completed.
Use the new Order Dispatching Filter to add Customer or Item Category filtering.
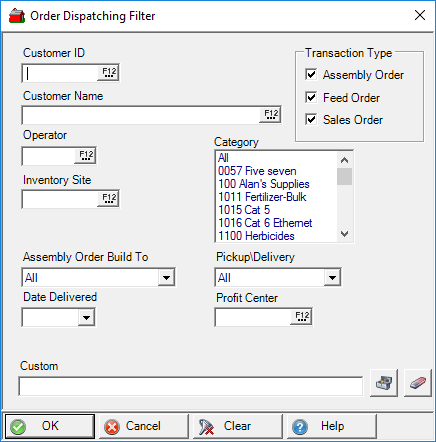
The Dispatch Order grid can also be filtered by specifying a Field Rep by entering the ID or selecting F12 to search.
Focus on a Ship Date or create a Ship Date range by entering an Expected Ship date and To date.
Use  to choose a Sort by field, choose Ascending or Descending or enter a keyword or sort the grid by clicking on a column title.
Delivery From and To date fields will allow listing the orders already delivered. List only the orders delivered by a specific person by entering the Operator ID in Delivery By.
Refresh, Map Deliveries or Export the Grid
Manually refresh the grid by clicking the Refresh button or select the checkbox to Auto Refresh. If Auto Refresh is selected, the grid will be refreshed at the interval set in the Dispatching Grid Refresh parameter.
Use  to view the customer ship to locations for the selected orders. Build to Site displays as the customer name for all Build to Site Assembly Orders and are excluded from the map.
Select  to export an .xls version of the grid to the Downloads folder.
Use Dispatch Order
Understand the Dispatch Grid

After selecting applicable filters, the Dispatch Order grid displays all matching Orders.
The columns in the Dispatch grid begin with TransID that is also known as Order or Assembly ID.
Type will display OE for retail orders and feed orders and AO for assembly orders.
Use the Status column to view if the order is
- Pending
- Delivered
- Assembled
- Confirmed
- FieldAlytics orders will display a status of Accepted, Assigned or Completed.
Customer displays the Customer ID and Name the Customer Name.
Operator indicates the name of the Operator who entered the order.
The name of any primary Field Rep associated with the customer account is included.
Entered indicates the date the order was entered.
If a Quote was provided for the order, the date is displayed in Quoted.
Once an Order has been Confirmed, the date is displayed. This is the first step for delivery of an order.
The Pickup column is selected for any order set to Pickup as the Point of Sale.
Exp Ship displays any Expected Ship date selected for the Order. Use Edit Checked to enter an Expected Ship date.
The date and time of an order delivery is displayed in Delivery with who performed the delivery in the Deliver By column.
Locations using Vehicle Tracking can use the Vehicle column to view the Vehicle ID used for delivery.
View any Scale Ticket ID included on the order.
Any Drop number which can be up to four characters displays in Drop.
Site IDs for the Profit Center and Inventory Site are included.
Completed will indicate the a FieldAlytics order was completed.
Any Order Comment entered is displayed in the Notes field.
Item and Item Description displays the Item ID and Description of the first item on the order.
Use the checkbox to the left of TransID to select an Order and then select Open Order or Edit Checked.
All Orders remain on the Order Dispatching grid until they are settled.
Enter an Expected Ship Date
Use 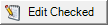 to enter an Expected Ship Date for any Retail, Feed or Assembly Order.
Select an Order and click the Edit Checked button.
In the Edit Orders window, set an Expected Ship Date using the drop down calendar or enter using the mm/dd/yy date format.
Enter up to four characters as the Drop number.
For Assembly Orders set to Build to Site, Edit Orders can be use to change the Site ID for Build to Site. Enter the Site ID or select F12 to search.
Click OK to accept the changes that now populates the Expected Ship field on the Orders Dispatching grid, the Misc Info tab of Feed and Retail Orders and in the Expected Ship field in Assembly Orders.
Settle Orders

The option to settle Orders from Access Dispatching is available to any location with the Allow AR Settlement of Orders and Batches from Dispatching parameter found in Merchant Ag PM > Admin > Installation > Access Parameters > AR > General.
User Profiles should also have Settle to AR set to the Level 1 in Merchant Ag FIN > Admin > System Security > Access User Profiles > select a Profile > Security tab > Orders > Access Dispatching.
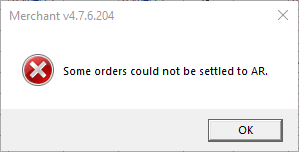
Select one or multiple batches for an individual customer using the checkbox to the left of the TransID column and click the Settle button. If a Manager Password is required to address credit issues, the window will appear. A notice will appear if any batch couldn't be settled to AR.
Using the email address found in Customer detail > Setting, invoices for the settled batches will be sent.
Confirm and Deliver an Order

Select a Retail or Feed Order then click the Open Order button to initially Confirm then indicate Delivery of the order.
Use Confirm in the upper left hand corner of Open Order detail for retail orders or Open Feed Order Detail for Feed Orders. Review any date for the Expected Ship date by clicking the Misc Info tab in the order.
Click the Confirm button to Confirm the order.
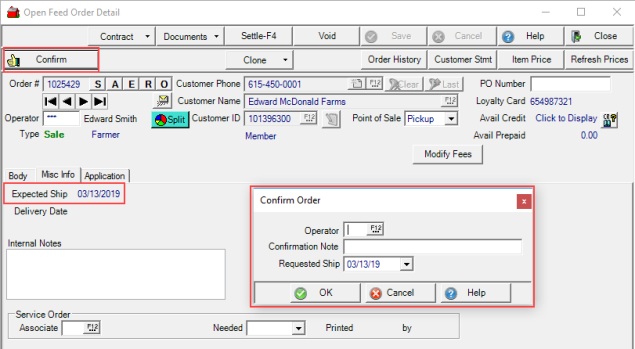
In the Confirm Order window, enter the Operator ID of who is confirming the order.
Provide an optional Confirmation Note of up to 65 alpha-numeric characters.
Requested Ship can be used to set an Expected Ship Date or update an existing Expected Ship date.
Once an Order has been Confirmed, access the Open Order button to indicate the Delivery Date and Time.
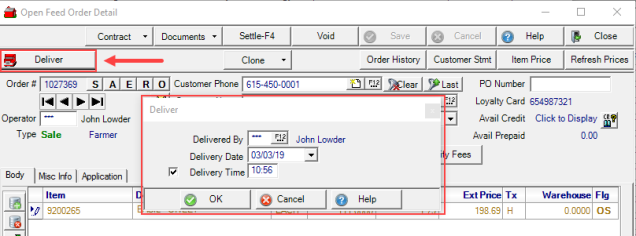
Enter the Operator ID for Delivered By.
Provide the Delivery Date by using the drop down calendar or by using the mm/dd/yy date format.
If a Delivery Time is needed, select the checkbox and enter a time using the 24 hour clock.
The Open Order button can also be used to access retail and feed orders to settle and to finalize assembly orders.